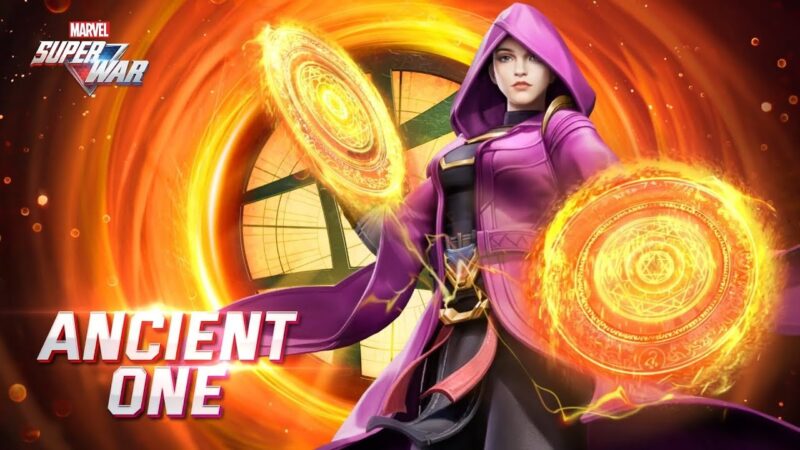
Ancient One in Marvel Super War is a Power type with Hard difficulty and is an S Tier Hero. Ancient One Inter-Dimensional Travel can change the tide of the game by teleporting the most important but weak hero (Support or energy hero) to your team.
Ancient One Stats
| Class | Power |
|---|---|
| Difficulty | Hard |
| DSP | 80% |
| Defense | 60% |
| Mobility | 100% |
| Support | 80% |
Ancient One Attacks


Abilities Details
Sorcerer Supreme
Passive: Once Ancient One uses both Tao Mandala and Illusion Shift, a mandala takes form around her and explodes after 1.5 seconds, dealing 30(+60%Energy Attack) (+10*Level) energy damage to nearby enemies. If an enemy hero is hit, Ancient One gains a layer of energy. At 3 layers, Ancient One enters Peak State.
Peak State enhances Tao Mandala and Illusion Shift. 45%/50%/55%/60% of damage dealt converts to HP (conversion ratio increases at Lv. 1/6/11/16).
Each time Ancient One enters or leaves Peak State, the cooldown for Tao Mandala and Illusion Shift is reset.
Tao Mandala
Ancient One throws a Tao Mandala in the specified direction, dealing 100(+70%Energy Attack) energy damage to enemies in the path of its arc. She also gains a shield that absorbs 20(+25%Energy Attack) (+3.5%Bonus Max HP) damage. If the mandala hits an enemy hero and returns to her, she gains another shield that absorbs 20(+25%Energy Attack) (+3.5%Bonus Max HP) damage.
Peak State: Ancient One’s Tao Mandala splits into two, each dealing 80(+50%Energy Attack) energy damage. If a Tao Mandala hits the same enemy multiple times, subsequent damage will be reduced by 0.6.
Illusion Shift
Ancient One blinks in the specified direction.
Peak State: Reduces the cooldown by Illusion Shift.
Astral Projection
Ancient One separates her astral form from her body and shifts control to her astral form. Her body remains in place with 60% damage reduction and control immunity while her astral form gains 75% acceleration for 3 seconds. Her astral form deals 80(+40%Energy Attack) energy damage when passing through enemies and slows them by 65% for 0.75 second(s).
The ability lasts up to 3 seconds. Using the ability again while it’s still active returns her astral form to her body early.
Inter-Dimensional Travel
Ancient One immediately gains vision of all heroes who haven’t been KO’d for 5 seconds.
When used a second time within 5 seconds, Ancient One shoots a mandala in the specified direction until it reaches its max distance, where it opens one portal at the max distance and one below Ancient One. Ancient One then teleports to the distant portal after 0.2 seconds.
If the mandala hits enemy heroes, it will mark the enemy hero who is struck first and create a portal below Ancient One and the target. Ancient One then switches locations with the target after 0.2 seconds.
Ancient One Gameplay Guide
Passive: whenever you cast her first and second skill, a circle will appear below her. It will detonate after a short while and if it hits heroes, it will give her 1 charge. Get 3 of these to get “peak state.”
This means at LVL 1, ancient one is hella weak. Don’t even bother trading with anyone, you will die. On peak state, you refresh your skills (s1 and s2 are most important), your s1 and s2 become really powerful, you gain a lot of spell vamp with them, and you lose the whole charge over a few seconds. You also refresh your skills again when you go out of it.
This basically means you’re hella weak until you get to level 3, and then become an absolute monster while you go in AND out of peak state.
Your mandala instantly bursts and a new one is created if you use your 1st or 2nd skill while your mandala is still forming. This is why your combo S2 followed by S1 gives you 1 charge instantly.
Her second skill is short-range blink. Because of her passive, it also generates a little circle beneath Ancient One whenever you use it.
Remember the CD refreshes whenever you enter/exit peak state. In peak state, the cooldown is significantly reduced (I remember blinking every 1 second, yep, that short) This will be very important for the next lines that follow.
The first skill throws a projectile in front of you (medium distance, but piss poor vs typical mage’s skillshots) which will then go back to you. The projectile returns at an angle VERY slightly to the left of where you threw it. You gain a little shield once you use the skill, and you get ANOTHER shield once it goes back to you, BUT ONLY if it hits an enemy hero.
In peak state, you throw two projectiles in front, they will then travel to the left and right. Keep in mind that both versions of the projectiles will return faster to ancient one if you aim it closer to her.
Regardless if you’re on peak state or not, each projectile can only hit the same target once. So sadly no fancy, shoot someone-> have the projectile return -> blink in front of the projectile to maybe damage the enemy again shenanigans here. You can however make the returning projectile still hit targets that have never been hit yet.
So if you gain shields whenever your s1 hits a hero, and more when the s1 projectiles return to you, remember that you can also use s2 (the blink) to reposition yourself to get the projectile back earlier.
So aside from throwing s1 just at the right distance, you also have the option of getting your second shield earlier by just picking the projectiles up. JUST be careful not to jump past them, because then it will delay when you get the shields.
S3 lets ancient one summon a clone of herself that has slightly increased move speed. You basically control clone (it passes through walls) and you get to stun whoever gets hit with it. Unlike s1 and s2, the peak state doesn’t buff this in any way. Press it again to unsummon the projection and gain control of your heroine again.
You can either do a quick press when the target’s near just to stun them quickly OR keep being immobile to enjoy your limited CC immunity and damage reduction. You can even use this ability from afar if you think you can’t evade what’s coming and just need the damage reduction (i.e thor ult or a rampaging thing).
Basic engage combo is S2 followed by a quick S1 throw, hopefully, you’ll be beside the enemy at this point, then s3 asap so you can stun them before they get out of the circle’s range AS well as enjoy the benefits of temporary cc immunity and dmg reduction.
As you can see, this will only give you 2 charges for your passive and you only become a monster whenever you get 3, so you may have to rely a lot on your teammates to kill someone early on (unlike Deadpool who can chunk 50% of an enemy’s health LVL 2 easily).
This also means in the lane, you can sort of lose the first LVL 2 trade vs an enemy and then go all in once you get LVL 3 and have 1 or 2 charges of your passive beforehand.
If you get your passive up, this is pretty much where the fun begins. In the lane, remember to throw your s1 to hit as many targets as you can (including minions) because, at a full passive charge, you gain a lot of spell vamp. The more targets you hit, the more life you gain back.
In team fights, this is where you see ancient ones typically doing 1v3 or 1v4’s reliably and not getting obliterated like other heroes. During the whole skirmish, always check if your passive’s bar is almost empty because you get another s1 and s2. One trick I’ve learned is to save my last blink during peak state just before it runs out so that I can time the circle detonation to add another charge to my passive.
Time this very well with your now refreshed s1 and s2 and guess what? You’re in peak state again when the circles detonate. I’d honestly think this is the most complicated aspect of AO. If you just spam blink and s1 haphazardly, you’ll only be able to get a maximum of 2 charges when you get out of peak state, and as we all know, some team fights tend to end in seconds.
Her ult has three purposes, though you’ll only use 2/3 every time (a) It reveals enemy heroes and (b) a way to swap key targets from afar -> so either throw it at the tank then engage 1v4 while your peak state’s up (in this case, I’d actually recommend throwing the s1 first and waiting for a bit before blinking in, so you can do the trick I mentioned before where you go out and then back into peak state asap to refresh your skills again).
You can also target their carry then distract the enemies without actually engaging the backline since it’ll be 1v4 with their tank. Regardless, the best time to use your ult is when you’re in beside your tower. If you don’t target anyone (c), it’s a long-range teleport.
Role
Ideally, jungle, get S1 and S2, and start harassing (don’t expect early game kills until LVL 3 onward). Once you have ult, surprise the enemy by teleporting any of them to your turret for your teammate to finish off. Otherwise, just use it to reveal heroes and maybe steal their jungle buff with leech or kill em. Or even attempt to split pushing with it. If it works it works.
Build Items
Recommend gaining 20% CDR first with the energy jungle item, and cooldown boots then rush mejingord for the max hp and regen outside of battle. Your shield scales VERY slightly with max hp and you’ll always be in the middle of the fight. Pure energy-build ancient ones are very squishy and pure tank builds do 0 dmg with very little CC. I’ve had the most success going energy cdr with some hp. After mejingord, get 40% cdr asap. That item that gives bonus energy damage on the next basic attack after casting skill on a 1.5-second cooldown works amazingly on her. In team fights, hit as many as you can, keep your hp + shields up, you can slightly tower, dive, this way but IIRC her s3’s damage reduction doesn’t work vs towers.
Cores
It’s pretty simple. Get the one that recharges whenever you attack or move (because you’ll be doing that a lot) and at 100% charge makes your next auto attack reduce the enemy’s defenses because this build that I’m suggesting has no % or flat magic resist reduction. Get the core that also reduces dmg from monsters (cause you’ll be mostly jungling). Also, get that low cooldown core that lets you do aoe dmg on the ground after hitting anything with your ability, it lets you jungle faster and my god do you really need that lvl 3/4).
Join Discord server.







Leave a Reply